





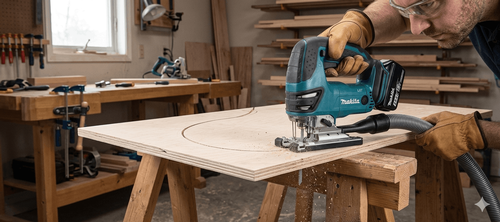
You have a jigsaw in hand or are about to buy one. It looks straightforward until the first cut goes wrong — the blade wanders, the wood splinters, or the line curves off track. Here is the good news: those problems almost always come down to blade choice, speed setting, or technique, not the tool itself. The jigsaw is one of the most versatile power tools you can own, and with the right setup it delivers clean, precise cuts every time. By the end of this guide you will know exactly how to set it up, which blade to use, and how to cut wood, metal, tile, and more with confidence.
What Is a Jigsaw Good For?
The jigsaw is one of the most versatile power tools you can own. One blade change and it cuts wood, metal, ceramic, or plastic. It handles curves that a circular saw cannot follow and tight spaces where larger saws won't fit.
Where the jigsaw wins:
- Curved and irregular cuts — worktop cut-outs, decorative shapes, pipe holes
- Plunge cuts — starting a cut in the middle of a panel without a lead-in edge
- Bevel cuts — tilting the base plate for angled edges
- Mixed materials — swap the blade and cut wood, metal, tile, or laminate with the same tool
Where to use something else: long straight rips across sheet material. A circular saw with a guide rail is faster and more accurate for that job.
For most DIY and trade work — fitting a kitchen worktop, cutting shelving to shape, trimming a door, or opening a hole in a floor panel — the jigsaw is the right tool. Learn to use it properly and it earns its place in your kit permanently.
Know Your Jigsaw — Parts and Settings
Before your first cut, spend two minutes understanding the controls. Every setting affects the result.
Blade clamp
Two systems exist: tool-less (push-button or lever) and keyed (requires an Allen key). Tool-less is faster for blade changes. Either way, always check the blade is fully seated and locked before cutting.
Orbital action
This dial controls how aggressively the blade moves. On setting 0, the blade moves straight up and down — clean, precise cuts. Higher settings add a forward scooping motion on the upstroke, cutting faster but leaving a rougher edge.
- Setting 0: metal, ceramic, fine woodwork
- Setting 1–2: general timber, plywood, MDF
- Setting 3: fast rough cuts in thick softwood
Speed control
Most jigsaws have a variable-speed trigger plus a dial that sets the maximum speed. Slow down for metal and hard materials. Higher speed for soft wood. Let the material guide you — if the blade overheats or the cut feels forced, drop the speed.
Base plate (shoe)
The flat plate that rests on your workpiece. Keep it pressed firmly against the surface throughout the cut. Most shoes tilt left and right up to 45 degrees for bevel cuts — loosen the adjustment bolt, set the angle, and retighten before you start.
Dust blower
A small fan that clears sawdust from the cut line so you can follow your mark. Use it. On fine work, pair it with a vacuum attachment if your model supports one.
If you need a reliable model with tool-less blade change and variable orbital settings, browse our jigsaw range at Sozos.
Choosing the Right Blade
The blade determines the quality of every cut. The tool itself can only perform as well as the blade fitted to it.
Shank type
Most modern jigsaws use T-shank blades — the industry standard for tool-less clamps. Older models may use U-shank. Check your jigsaw before buying blades. T-shank is the safer default choice for any new purchase.
Wood blades
Measured in TPI — teeth per inch. Low TPI (6–10) cuts fast but leaves a rough edge, good for structural timber where finish does not matter. High TPI (10–20) cuts slower but cleaner, ideal for plywood, MDF, and any surface that will be visible. As a rule, keep at least 3 teeth in contact with the material at all times.
Metal blades
High TPI (18–24), thin kerf, hardened teeth. Set orbital action to 0 and reduce speed. Use cutting oil on the line to reduce heat. Never use a wood blade on metal — the teeth strip immediately.
Ceramic and tile blades
No teeth — a grit-coated tungsten carbide edge that grinds rather than cuts. Slow feed, no orbital action, steady pressure. These are the correct choice for cut-outs around wall fixtures or curves in tiles where a tile cutter cannot reach.
Laminate and downstroke blades
Standard blades cut on the upstroke, which can chip the top face of laminates and veneered panels. Downstroke blades reverse this — the teeth face downward, keeping the visible face clean. Alternatively, apply masking tape over the cut line and cut through the tape.
Essential Safety and Setup
Good preparation takes three minutes and prevents most accidents and ruined cuts.
Personal protection
- Safety glasses — blade teeth and offcuts throw debris at eye level
- Ear protection — jigsaws are loud over extended use
- Dust mask — MDF and treated timber produce fine dust you should not inhale
Secure the workpiece
Never hold the material with your free hand. Clamp it to a workbench or sawhorses, leaving the cut line hanging free over the edge. A workpiece that moves mid-cut ruins the cut and risks injury.
Mark the cut line clearly
Use a pencil and a straight edge for straight cuts. For curves, use a template or draw freehand and stay just outside the line — you can sand or trim back, you cannot add material.
Check for hidden hazards
Before cutting into any floor panel, wall section, or built-in surface, scan with a pipe and cable detector. Kitchens and bathrooms especially hide electrical cables and water pipes close to the surface.
Cable and battery check
On corded models, route the cable behind you and away from the cut line before you start. On cordless, confirm the battery is fully seated and the charge is sufficient for the job. A mid-cut power loss can jam the blade and damage the workpiece.
Once your PPE is on, the workpiece is clamped, and the cut line is marked, you are ready to cut.
Step-by-Step: How to Make a Basic Cut
Step 1: Fit the correct blade
Match the blade to the material using the guide above. Insert it fully into the clamp until it clicks or locks. Give it a firm tug to confirm it is seated. A loose blade wanders and can snap mid-cut.
Step 2: Set orbital action and speed
Set orbital action based on your material — 0 for metal and fine cuts, 1–2 for general timber. Set the speed dial to suit the material. You can fine-tune with trigger pressure once you start cutting.
Step 3: Mark and clamp the workpiece
Draw your cut line clearly. Clamp the material so the cut line is supported on both sides but the blade has clearance beneath. Check nothing is in the path of the blade underneath.
Step 4: Position the shoe before switching on
Place the front edge of the shoe flat on the surface, blade clear of the material. Never lower a running blade onto the workpiece from above — start with contact already made.
Step 5: Start the blade before contact
Squeeze the trigger to full speed before the blade touches the cut line. A blade that makes contact while accelerating can snatch or chip the edge.
Step 6: Feed slowly and steadily
Guide the saw forward at a pace the blade can handle. You will feel resistance if you push too fast — ease back. Let the blade cut, do not force it.
Step 7: Keep the shoe pressed flat
Maintain downward pressure on the shoe throughout. Lifting the shoe tilts the blade and the cut goes off square. Watch the cut line, not the blade.
Step 8: Slow down at the end of the cut
As you approach the end of the cut line, reduce feed speed and support the offcut with your free hand if possible. Letting the waste piece drop and tear at the last moment damages the edge.
Cutting Techniques
Once you are comfortable with a basic straight cut, these techniques cover most real-world jobs.
Straight cuts
The jigsaw blade has no built-in guidance — it follows pressure, not a track. For accurate straight cuts, clamp a straight edge or timber batten parallel to the cut line and run the shoe against it throughout the cut. Measure the offset between the blade and the shoe edge before clamping your guide.
Curved cuts
Feed slowly and let the blade steer. For tight curves, make relief cuts — straight cuts from the edge of the material into the waste side of the curve. These release tension and let the blade turn without binding. The tighter the curve, the more relief cuts you need.
Plunge cuts
Used when you need to start a cut in the middle of a panel — a worktop socket hole, for example. Tilt the jigsaw forward onto the front edge of the shoe. Start the blade at full speed, then slowly lower it into the surface until the shoe sits flat. Only attempt plunge cuts in wood and soft materials — never in metal or tile.
Bevel cuts
Loosen the shoe adjustment bolt, tilt to the required angle, and retighten firmly. Check the angle with a protractor or digital angle finder before cutting. Account for blade drift — make a short test cut in scrap material first.
Cutting metal
Use a fine high-TPI blade, set orbital action to 0, and reduce speed. Apply a few drops of cutting oil along the cut line to reduce heat and extend blade life. Let the blade do the work — forcing it through metal blunts the teeth immediately.
Cutting ceramic tiles
Fit a grit-edge tungsten carbide blade — no teeth, just abrasive edge. Set orbital action to 0, speed to low, and feed very slowly. Keep the shoe pressed flat and do not force the cut. For straight tile cuts, a tile cutter is faster — the jigsaw earns its place here for curves and cut-outs around fixtures.
Common Mistakes and How to Avoid Them
Blade wander
The blade drifts off the cut line. Usually caused by feeding too fast, using a worn blade, or applying uneven side pressure. Fix: slow down, fit a fresh blade, and use a clamped guide for straight cuts.
Splintering on the top face
Standard blades cut on the upstroke, pulling fibres upward and chipping the surface. Fix: apply masking tape over the cut line, use a downstroke blade for laminates, or score the line with a sharp knife before cutting.
Blade overheating
The blade turns blue or the material scorches. Caused by too much speed, wrong blade for the material, or cutting without orbital action in thick timber. Fix: reduce speed, match the blade to the material, and use cutting oil on metal.
Shoe marking the workpiece
The metal shoe scratches finished surfaces. Fix: stick masking tape to the underside of the shoe before cutting, or fit a plastic shoe protector if your model supports one.
Lifting the blade before it stops
Pulling the jigsaw away from the workpiece while the blade is still moving damages the blade teeth and can tear the edge of the cut. Always release the trigger and wait for the blade to stop completely before lifting the saw.
The jigsaw rewards patience. Three things decide every cut: the right blade, the correct speed and orbital setting, and a workpiece that cannot move. Get those right and the jigsaw handles curves, straight lines, plunge cuts, and a wide range of materials with ease. Browse our jigsaw and blade range at Sozos to make sure you have the right setup before you start.