





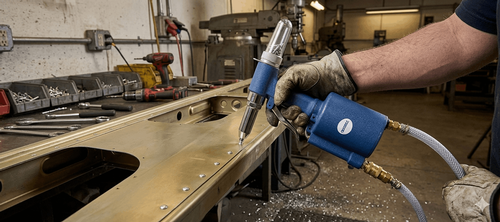
You need to join two sheets of metal and there is no access to the back face. A rivet tool does this in seconds — no welding equipment, no bolts, no second pair of hands holding a nut.
The problem is that poor technique is easy to miss until the joint fails. The wrong rivet size, an angled pull, or a hole that is slightly too large all produce joints that look fine and fail under load.
This guide covers everything you need: how a rivet tool works, how to pick the right rivet, and how to pull a clean joint from the first hole to the last. By the end, you will be able to set up, size, and use a rivet tool with confidence on any standard job.
What Is a Rivet Tool and When Do You Use One
You've got two pieces of sheet metal to join and no access to the back face. A rivet tool solves this in seconds — no welding, no bolts, no second pair of hands.
Here's how it works. You insert a pop rivet into a pre-drilled hole. The tool grips the mandrel — the thin metal pin running through the rivet — and pulls it. This draws the rivet body back against the material, expanding it into a tight flange on the blind side. When the tension peaks, the mandrel snaps off flush. The joint is done.
The result is permanent, vibration-resistant, and clean on the visible face.
When to reach for a rivet tool
- Joining sheet metal where the back face is inaccessible — gutters, ducting, panels
- Automotive bodywork and trim
- Signage, enclosures, and electrical boxes
- Leather goods and heavy fabric
- Anywhere screws would strip or weld access is impossible
Manual, pneumatic, or battery — which do you need?
A manual hand riveter handles occasional jobs and standard aluminium rivets up to 4.8mm. It costs less and needs no power source. For most homeowners, it is enough.
A pneumatic rivet tool is the choice for production work or large-gauge steel rivets. It pulls consistently and reduces hand fatigue on high-volume jobs. You will need an air compressor with adequate CFM.
A battery rivet tool sits between the two. It handles larger diameters than a manual tool, works cordlessly, and suits tradespeople who rivet regularly on site.
If you need a reliable option, browse our rivet tool range for manual and powered models suited to both occasional and professional use.
Types of Rivets and How to Choose the Right One
Pick the wrong rivet and the joint will either pull through, spin loose, or never seat properly. Two minutes of selection saves a failed joint.
Blind (pop) rivets
The standard for most jobs. Called "blind" because you only need access to one side. Available in every common material and diameter. If you are doing general repair, fabrication, or installation work, this is what you want.
Structural rivets
For load-bearing joints where a standard pop rivet is not strong enough. They use a locking mechanism that retains the mandrel inside the rivet body, significantly increasing shear and tensile strength. Use these on brackets, frames, and anything that takes regular stress or vibration.
Rivet material — match it to your application
- Aluminium — lightweight, corrosion-resistant, easy to pull. Suits most general applications.
- Steel — stronger than aluminium, used where load matters. Requires more pull force.
- Stainless steel — for outdoor, marine, or food-contact environments where rust is a concern.
- Copper — for electrical applications or decorative work.
A rule of thumb: match the rivet material to the material being joined. Mixing metals in damp environments causes galvanic corrosion.
Diameter and length — getting the size right
Rivet diameter must match the drilled hole exactly. Common sizes are 3.2mm, 4mm, 4.8mm, and 6.4mm. Too small and the rivet rattles. Too large and it will not insert.
Length is determined by grip range — the combined thickness of all materials being joined. Every rivet has a minimum and maximum grip range printed on the packaging. Measure your total material thickness with a calliper, then choose a rivet whose grip range covers that number.
If you are between sizes, size up. A rivet set at the top of its grip range seats more reliably than one stretched beyond it.
Tools and Materials You'll Need
Before you drill the first hole, have everything on the bench. Stopping mid-job to find the right nose piece or a matching drill bit leads to misaligned holes and mismatched rivets.
The rivet tool
Match the tool to the job as described above. Whichever type you use, check that the nose piece is tight and undamaged before you start. A worn nose piece slips on the mandrel and produces incomplete pulls.
Nose pieces
Most rivet tools come with a set of nose pieces for different rivet diameters — typically 3.2mm, 4mm, 4.8mm, and 6.4mm. Always fit the nose piece that matches your rivet diameter exactly. The wrong size either grips poorly or damages the mandrel on the pull.
Drill and drill bits
Use a sharp HSS or cobalt bit sized to match the rivet diameter exactly. A blunt bit tears the hole edge rather than cutting it cleanly, which affects how the rivet seats. For steel or stainless rivets, a cobalt bit holds its edge better than standard HSS.
Have a deburring tool or a larger bit on hand to clean the hole edge after drilling.
Clamps
The materials must be held flush and tight together before riveting. Any gap between layers means the rivet will not close the joint properly. Use at least two clamps — one either side of the rivet location.
Safety equipment
- Safety glasses — mandrels snap off under tension and can travel
- Work gloves — sheet metal and drilled hole edges are sharp
Step-by-Step Guide to Using a Rivet Tool
This is where preparation pays off. Follow the steps in order and you will pull a clean, tight joint every time.
Before you begin: Align the pieces exactly as they will sit in the finished joint. Clamp firmly on both sides of the rivet location. The materials must not shift during drilling or riveting. Check alignment visually before you touch the drill.
Step 1: Drill the hole
Select the bit that matches your rivet diameter exactly. Drill through both layers in one pass. Keep the drill perpendicular — an angled hole produces an angled rivet. Apply steady pressure and let the bit do the work.
Step 2: Deburr the hole
Run a deburring tool or the tip of a larger bit lightly around both sides of the hole. Burrs prevent the rivet flange from seating flush and can cause stress cracks in thin material over time.
Step 3: Fit the correct nose piece
Confirm the nose piece matches your rivet diameter. Hand-tighten it firmly. Give it a short pull on an empty rivet to check grip before loading a real one.
Step 4: Insert the rivet into the tool
Push the mandrel into the nose piece until the rivet body is fully seated against it. The rivet should not wobble or slide freely.
Step 5: Insert the rivet into the hole
Push the rivet body fully into the drilled hole until the flange sits flat against the material surface. If it does not go in smoothly, the hole is undersized — do not force it. Slightly enlarge the hole and retry.
Step 6: Hold the tool perpendicular and pull
Position the tool at 90 degrees to the material surface. Squeeze the handles or pull the trigger in one smooth, continuous motion. Do not angle the tool mid-pull. Stopping halfway leaves a partially expanded rivet that will need drilling out.
Step 7: Confirm the mandrel snaps
You will hear and feel a clean snap when the mandrel breaks. If it does not snap, the rivet is undersized for the nose piece or the tool is not gripping fully. Release, reposition, and pull again with firm pressure.
Step 8: Inspect the joint
Turn the work over and check the blind side. The rivet body should be expanded into a wide, flat flange sitting tight against the material. Any gap between the flange and the surface means the grip range was too long. Check the visible side too — the mandrel stub should sit flush or just below the rivet head.
Step 9: Clear the mandrel
Most tools collect spent mandrels in a built-in catch. Empty it regularly. A full catch can jam the mechanism mid-job.